|
You can easily create a new
PowerPoint presentation directly in PowerPoint.
In the steps below, you will start with a blank presentation and then add
slides and text. For now we are just interested in getting the information
onto slides. Making it pretty comes in the next project!
Style Check
Once you have entered all your text, you can turn on a PowerPoint feature
to check to see if you have made good choices. Items with style issues will
have a light bulb in the placeholder's corner.
Turn Style Check on and off from Tools | Options.
Remember - Office Assistant must be turned on.
What's included in the style check?
- Capitalization is consistent
- Punctuation is consistent
- Number of font styles
- Minimum font size for title text and body text
- Maximum number of bulleted items
- Maximum number of text lines in title text or in a list item
|
|
Where you are:
JegsWorks > Lessons > Presentations
Before you start...
Project 1: PowerPoint Basics
Getting Started
Interface
Create

 From
Blank Slides From
Blank Slides
Printing
Summary
Quiz
Exercises
Project 2: PowerPoint Formatting
Project 3: Advanced PowerPoint
Search
Glossary
Appendix
|
|
 |
Step-by-Step:Create from Blank Slides |
|
What you will learn: |
to open a blank presentation
to save a presentation
to enter title and slide text
to add a new slide
to remove bullets
to add a text table
to change the order of slides
to view the outline
to use Spell Check
to use Style Check
to view Slide Show
|
Start with:
 (PowerPoint open to a blank document)
The Story behind this presentation:
World Travel Inc. is a fictional travel agency in Buenos Aires,
Argentina. As part of an anniversary celebration, they offered some of
their best customers some special trips.
What you will create:
A simple on-screen presentation to summarize the results of sales from the
special anniversary trips.
Open Blank Presentation
-
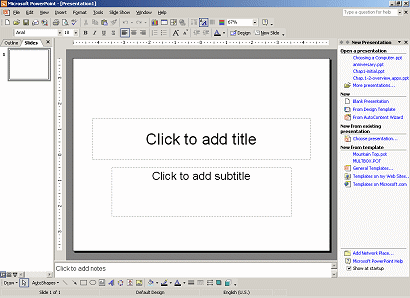
If necessary, open PowerPoint. The default
blank presentation shows. The Title slide is the only slide in the presentation
at this point, as you can see at the left in the Slides tab.
 The task pane will show the Getting Started pane.
-
 Insert
your Class disk into the disk drive. Insert
your Class disk into the disk drive.
-
Click
on
 the Save button on the Standard toolbar. Since this presentation has
never been saved before, the Save As dialog appears.
the Save button on the Standard toolbar. Since this presentation has
never been saved before, the Save As dialog appears.
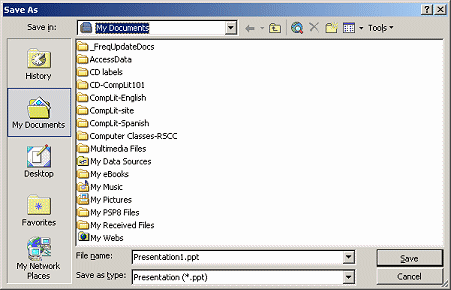
Default Location:
My
Documents. (The location of the folder My Documents depends on
the version of Windows you are using.) You will change that.
Default File Name: Presentation1.ppt. You will always want to change that. What a
terrible name!!
Default File Type: Presentation, with the extension
.ppt.
These lessons will direct you to save your files to a
removable disk
that we will call your Class disk. Removable disks include floppy
disks, Zip disks, and USB flash drives. You can, of course, save your
documents to the hard disk if you need to. Just remember where
you saved your file!
It is normally a good strategy to save to a removable disk when you
are working in a computer lab. It allows you to take your unfinished
documents with you and work on them at home or on another computer.
 Network
space: Have you been assigned space on the network for saving your
own files? How much space do you have? How and where can you save
files? Can you access saved files from any computer on the
network? Network
space: Have you been assigned space on the network for saving your
own files? How much space do you have? How and where can you save
files? Can you access saved files from any computer on the
network?
Not
network space: Any file that you save to the
hard disk besides in your assigned documents folder may not be there when you get back. Other users or network
administrators may delete stray documents. Keep a back up copy!
-
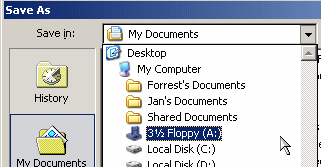 Navigate to your
Class disk drive
using the Save in: list at the top of the Save
As dialog. (Be sure your Class disk
is in the drive!) Navigate to your
Class disk drive
using the Save in: list at the top of the Save
As dialog. (Be sure your Class disk
is in the drive!)
-
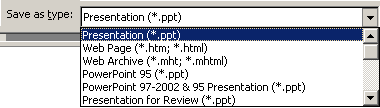
Scroll
the list of file types that PowerPoint can use when saving a file. It's
at the bottom of the dialog - Save
as type:. You have a lot of choices! The default choice is
Presentation (*.ppt), which is what you want this
time.
-
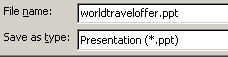 Save to your Class disk as worldtraveloffer.ppt
. Save to your Class disk as worldtraveloffer.ppt
.
 It is a good practice to save your
work as you begin, especially if you are modifying an existing file and
want to keep the old version, too. It is a good practice to save your
work as you begin, especially if you are modifying an existing file and
want to keep the old version, too.
Add Text to Placeholders
-
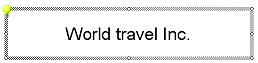
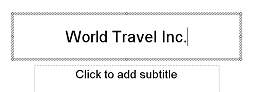 Click
in the Title placeholder (where it says "Click to add title") and
type: Click
in the Title placeholder (where it says "Click to add title") and
type:
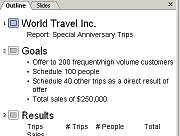
World Travel Inc.
-
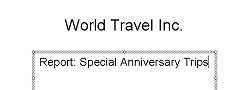 Click
in the Subtitle placeholder (where it says "Click to add subtitle" and type: Click
in the Subtitle placeholder (where it says "Click to add subtitle" and type:
Report: Special Anniversary Trips
Insert New Slide
The easy way to insert a new slide is to use the New Slide button. Duh!
-
Click the New Slide button

 on the
Toolbar to insert a new blank slide with the default slide layout - placeholders
for the slide title and for bulleted text. on the
Toolbar to insert a new blank slide with the default slide layout - placeholders
for the slide title and for bulleted text.
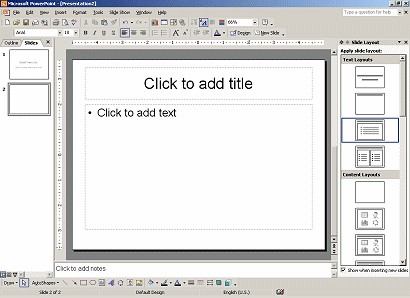
The Navigation pane at the left now shows 2 slides - the Title slide and a blank slide.
The Task Pane on the right changes to Slide Layout,
with the Title and Text
layout selected. This layout has placeholders for the Slide Title and for a
bulleted list.
At this point you could choose a different layout if you wished. For this
presentation, the default Title and Text layout will work fine.
-
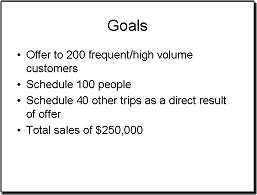
Type in the Title placeholder: Goals
- Type in the Text placeholder the list items:
Offer to 200 frequent/high volume customers
Schedule 100 people
Schedule 40 other trips as a direct result of offer
Total sales of $250,000
When you press the Enter key to create a new line, PowerPoint automatically adds a bullet. Handy!!
-
With the Goals slide selected, insert
another new slide by clicking the New Slide button. A blank slide appears after the selected slide.
- Type in the Title placeholder: Success? Yes!
- Type in the text placeholder:
# people > Goal by 24
AND
Total sales > Goal by $19,000!
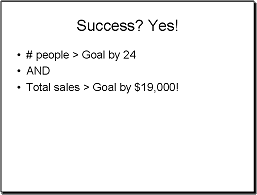
Hmmm. This information does not really need to be in a bullet list. You
can remove the bullets.
Remove Bullets
Bulleted text is not always what you need. But there is no standard layout that has a
placeholder for non-bulleted text. It's a good thing that you can remove some or all of the bullets
easily.
-
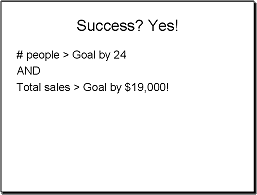 Put
your cursor in the first bulleted line and then click on Put
your cursor in the first bulleted line and then click on
 the Bullets button. The bullet vanishes and you have a plain text
paragraph.
the Bullets button. The bullet vanishes and you have a plain text
paragraph.
-
Repeat for the other two lines.
Text Table
When your information needs to be in rows and columns, you can either insert a table or create
a text table using tabs and spaces. This time you will create a text table,
just to see what that involves. A regular table may be a better choice. Be
aware, however, that the contents of a normal table will not show up in the Outline of
the presentation.
- Insert another new slide.
- Title the slide: Results
- Enter the text below in the bullet list placeholder. Use tabs
and blank spaces to get the text columns to line
up neatly. This is harder to do than in Word because there is no way to see
where the tabs and blank spaces are. No Show Marks button!
|
Trip
|
# Trips |
# People |
Total sales |
|
Tahiti
|
6 |
50 |
75,000 |
| NZ
|
5 |
30 |
90,000 |
|
World
|
2 |
4 |
24,000 |
|
Other
|
6 |
40 |
80,000 |
| Totals |
19 |
124 |
$269,000 |

Bullets galore! You don't need bullets for the column titles or the totals! Let's remove
those.
-
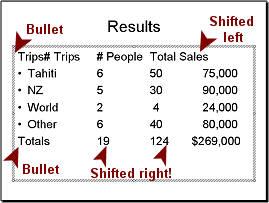 Remove
the bullet from the first and last rows. Remove
the bullet from the first and last rows.
Rats!
The spacing changes when you remove the bullets. How annoying!
Your slide may have different spacing than the illustration.
-
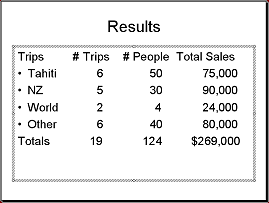 Adjust the spacing by typing in
or deleting blank spaces to make the columns line up
again. A tiny change caused a lot of work. (A regular table would not behave
this way!) Adjust the spacing by typing in
or deleting blank spaces to make the columns line up
again. A tiny change caused a lot of work. (A regular table would not behave
this way!)
Reorder Slides: Thumbnails
The last slide you created should really come before the Success slide. You
need to change the order of the slides, which is easy to do using the Slides
thumbnails.
-
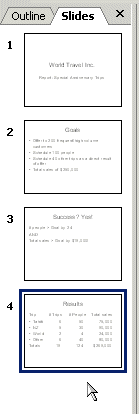 If
necessary, in
the Navigation pane at the left, click on the Slides tab and then on the 4th slide
(Results) to select it. A dark blue border surrounds the selected thumbnail. If
necessary, in
the Navigation pane at the left, click on the Slides tab and then on the 4th slide
(Results) to select it. A dark blue border surrounds the selected thumbnail.
-
Drag the thumbnail of the last slide
up. A black line indicates where the slide will be put if you drop.
-
Position the black line between slides 2 and 3 and drop.
The slide is moved and is now before the Success slide.
 Click the
illustration at the right to see an animation of the action. The animation
will run 5 times. Click again to run it again. Click the
illustration at the right to see an animation of the action. The animation
will run 5 times. Click again to run it again.
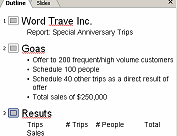
View Outline
-
 Click
on the Outline tab in the Navigation pane. The panes change dimensions to give
you more space for the outline. Click
on the Outline tab in the Navigation pane. The panes change dimensions to give
you more space for the outline.
-
Read the outline. Your text table data is all here. If the pane is too
narrow, the data won't be neatly lined up.
Is that a good
thing? That would depend on your table, wouldn't it?
Spell Check
Before you decide that you are done for the day, you had better check your
spelling! PowerPoint will not check your grammar. You won't usually use
complete sentences on your slides anyway.
To see how this works, let's make sure that there are some errors to find!
If you have mis-typed other words, you will find them now. This is a good
thing!
-
 From
the outline, delete the letter l from the titles of the first
three slides, making them read: Word Trave Inc. ,
Goas , Resuts From
the outline, delete the letter l from the titles of the first
three slides, making them read: Word Trave Inc. ,
Goas , Resuts
PowerPoint puts a wavy red line under the words that it thinks may be
wrong.
  No
wavy red lines? No
wavy red lines?
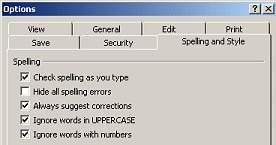
This feature is controlled from the Options dialog:
|.
Be sure there is a check mark beside Check spelling as
you type.
-
 In the
outline click to the left of the title
on the first slide to select it so that Spell Check will start at the
beginning. In the
outline click to the left of the title
on the first slide to select it so that Spell Check will start at the
beginning.
-
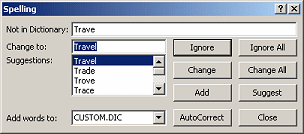
Click the Spelling button
 on the
toolbar. PowerPoint starts checking from the first slide. The first error it
finds is Trave . on the
toolbar. PowerPoint starts checking from the first slide. The first error it
finds is Trave .
Wait! What about Word that is supposed to be
World? Since Word is an actual word, PowerPoint does not see it as an error.
Spell Check will not find this type of error, only words that aren't in its
dictionary.
-
Click on the Change button to accept the first suggested
spelling, Travel . The word is changed
and the next spelling error is displayed:
Goas
- Select the word
Goals from the list of suggestions and
click on the Change button.
This time the correct word was not the first suggestion. Be careful to look
at the list!
The next error appears.
-
 Click on the
Change button to accept the first suggestion, Results .
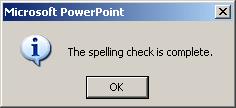
A message box appears to tell you that PowerPoint thinks it is done. Click on the
Change button to accept the first suggestion, Results .
A message box appears to tell you that PowerPoint thinks it is done.
-
 Correct
the first slide's remaining error to World
. Correct
the first slide's remaining error to World
.
Save
-
Click on
the Save button. Since the presentation had been saved before, it is
now saved with the same name and location, without giving you a chance to
change those. [worldtraveloffer.ppt ]
New Name or Location: When you
want to change the name or the location, you must use the menu
|
Those three dots ... tell you that the command will open a dialog.
Reduce File Size: Saving
in a new location or with a new name will reduce the file size, sometimes
dramatically.
View: Slide Show
It is important to know what your audience will see. The Slide Show view does
just that.
- If necessary, click slide #1 (the Title slide) to select it.
-
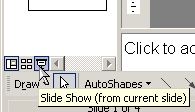 Click
the Click
the  Slide
Show button on the Views bar at the bottom left of the PowerPoint window. The
presentation opens starting with the selected slide. The presentation covers the whole monitor screen. Slide
Show button on the Views bar at the bottom left of the PowerPoint window. The
presentation opens starting with the selected slide. The presentation covers the whole monitor screen.
- Advance to the next slide by clicking on the slide or by pressing the
spacebar.
 After the last slide, the screen goes black.
At the top is the instruction "End of slide show, click to exit." After the last slide, the screen goes black.
At the top is the instruction "End of slide show, click to exit."
-
 Click
the screen or press the spacebar and your PowerPoint window reappears. Click
the screen or press the spacebar and your PowerPoint window reappears.
Refresh
this browser window to see an animation of the slide show at the right. [Click
the Refresh button on the IE toolbar or press the F5 key.]
-
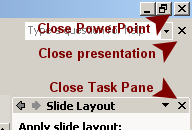 Close
the presentation by clicking Close
the presentation by clicking
 the Close
button for the presentation. the Close
button for the presentation.
Style Check
Now that your text is all entered, you can check to see if you have been
consistent with your capitalization and punctuation and if you have managed
your bullet lists well.
Style Check will put a light bulb in the upper left corner of a placeholder
when it has a suggestion, but you have to click on the placeholder first. Be
patient. It may take a second or two before the light bulb appears.
-
 From
the menu select ||. From
the menu select ||.
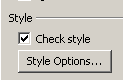
- Check the box beside Check style.
- Click on OK to close the dialog.
-
 From
the menu select | . From
the menu select | .
The Office Assistant cartoon figure appears.
- View the
first slide in the Slide Pane.
-
 Edit the
title to make the upper case T in travel into a lower case t. Edit the
title to make the upper case T in travel into a lower case t.
A light bulb
 shows up in the corner of the placeholder.
-
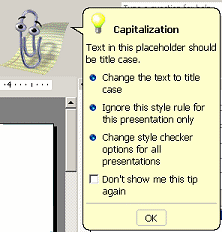 Click
on the light bulb. The Office Assistant presents some choices. Click
on the light bulb. The Office Assistant presents some choices.
-
Click on
Change the text to title case. The text goes back to
a capital T. Isn't this neat??
-
Check each of the remaining slides for light bulbs and make any
corrections that are needed. Be careful. Sometimes you have a reason behind
your formatting!
Save as which File Type?
 PowerPoint
can obviously save your work as a PowerPoint presentation. The file name
will have the extension .ppt. PowerPoint
can obviously save your work as a PowerPoint presentation. The file name
will have the extension .ppt.
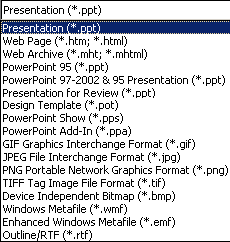
You do have other
choices, as the list at the right from the Save As dialog shows.
- Web page - HTML file with images saved in a folder
- Web Archive - HTML page and all images saved as one file
- Previous version of PowerPoint - newer features won't
work
- Design Template - shows in PowerPoint's New dialog or the New
task pane for creating
new presentations
- PowerPoint Show - opens directly to the show, instead of for editing
- Image - choice of formats: GIF, JPEG, PNG, TIFF, BMP, WMF, or
EMF; choice of saving just the current slide or all slides
- Outline/RTF - outline saved as a Rich Text Format word
processing document.
You now have the bare bones of your presentation. You will format it in
the next project to make it more attractive and more readable.
   
~~ 1 Cor. 10:31 ...whatever you do, do it all for the
glory of God. ~~
Last updated:
30 Apr 2012 |