
Note: This site will be taken down July 1, 2024.
Jan's Working with Windows:
Files: Text - Create & Save
To work with files you must first have some! Playing around with files already on the hard disk might get us all in trouble. So you will first create some files. Then you can play with them!
You learned to open an application from the Start menu or (Win8) Start screen in Windows Basics. In this section you will learn another method.
Notepad
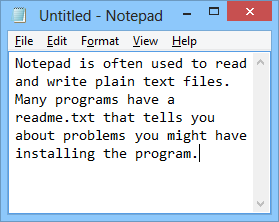
The application Notepad is a plain text editor. This means that you can create documents that contain only text - no graphics. It also means that you can't get fancy. No tables, frames, or other fancy features. So why bother??

Notepad: WinXP and Vista, Win7, Win8/Win8.1
Every word processor out there can read such a plain text document, when they don't read each other's file formats well at all! What Notepad creates is just fine for writing simple memos, lists, or quick notes and is widely used for writing programming code. So Notepad is well worth meeting.
Notepad opens with a new blank document ready for your typing. Many applications behave this way. Others offer you the option first of opening an existing document or picking a template for a new document.
The cursor is the shape that shows where the text you type will go. Different programs use somewhat different shapes. A vertical bar of some type is the most common. Do you see the cursor in the images of Notepad? It is the vertical bar at the end of the typing.
![]() Undo in Notepad: You can only undo the last action in Notepad. Clicking somewhere can be an action!
Undo in Notepad: You can only undo the last action in Notepad. Clicking somewhere can be an action!
Reminders of how a keyboard works:
- To type a capital letter like R or the symbol at the top of a key like $ or #, hold
the SHIFT key
 down
while you press the key you want.
down
while you press the key you want.
- To move the cursor down to create a new line,
press the ENTER key
 when the cursor is at the end of the line.
- Use the DELETE key
 to erase the character to the right of the cursor.
- Use the BACKSPACE key
 to
erase the character to the left of the cursor.
to
erase the character to the left of the cursor.
- To erase several characters or lines, select the text
you want to erase by dragging over it. The text is now highlighted with a background color and reverse color for the selected text. Press the DELETE key .
| |
Step-by-Step: Text - Create & Save |
|
| What you will learn: | to open an application from Computer/File Explorer to create a new document to save a document to close an application |
Start with: ![]()
![]()
Start a Program from Computer/Explorer
To use this method to open an application, you need to know:
a. the name of the file that starts the application
b. what folder the file is in
- Open a Computer or File Explorer window that shows the contents of the computer.
(Hint: Double click the My Computer/Computer icon on the Desktop.)
- If necessary, expand drive C and scroll down to the folder Windows.
- Select the folder Windows to show its contents in the right pane.
- In the right pane, scroll until you see the file notepad.exe.
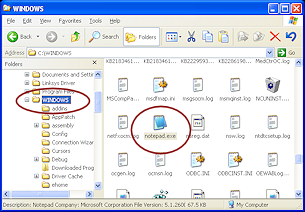
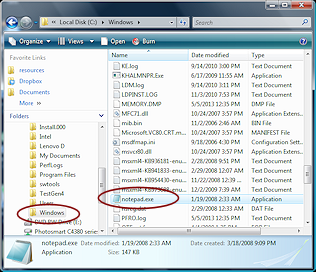


WinXP,Vista, Win7, Win8/Win8.1
 Problem:
Filenames do not show the extensions
Problem:
Filenames do not show the extensions
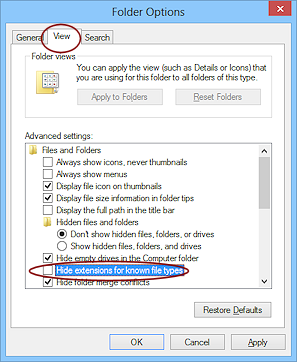
Most installations of Windows do not show the file name extensions by default. Anyone who works with many types of documents will understand why hiding the extension is a bad idea!Solution: Open Folder Options, in a Computer or File Explorer window and change a setting:
 WinXP: Open
the Tools menu and select Folder Options. Click on the View tab. Uncheck the
box for 'Hide extensions for known file types'. Click on OK and your change will be applied.
WinXP: Open
the Tools menu and select Folder Options. Click on the View tab. Uncheck the
box for 'Hide extensions for known file types'. Click on OK and your change will be applied.
 Vista/Win7: Click the Organize button, and then Folder and Search
Options. Click the View tab. Uncheck the box for 'Hide
extensions for known file types'. Click on OK and your change will be applied.
Vista/Win7: Click the Organize button, and then Folder and Search
Options. Click the View tab. Uncheck the box for 'Hide
extensions for known file types'. Click on OK and your change will be applied. 
 Win8: On the View ribbon tab, click the button Options and then on the View tab. Check the box 'File name extensions' to show the extensions.
  Double-click on notepad.exe to start the program.
Notepad opens with a blank document ready for your typing.
Create a Document
-
 Type the first line:
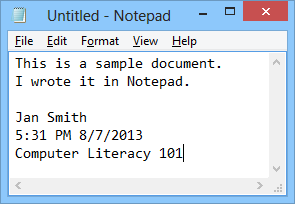
This is a sample document.
- Press the ENTER key to get a new line.
- Type the second line:
I wrote it in Notepad.
- Press the ENTER key twice to get a blank
line.
- Type your name.
- Press the ENTER key to get a new line.
- Select from the menu bar > to insert the current time and date.
- Press the ENTER key to get a new line.
- Type the name of the course you are taking that these lessons are part of.
Save a Document
 Insert the Class disk into the drive
or USB port, if it is not already there.
Insert the Class disk into the drive
or USB port, if it is not already there.
- Select from the menu bar > .
Since this document has not been saved before, you will see the Save As dialog box. For most applications the Save In text box shows the folder last used to save something, even if it was by a different program. Others programs have a default folder for saving files.
- Inspect this window and its menus.
In
WinXP you can click on  the Help button in the title bar of this dialog box and then click on each
part of the window in turn to see what it is for. This helpful feature was dropped in later versions for some reason.
the Help button in the title bar of this dialog box and then click on each
part of the window in turn to see what it is for. This helpful feature was dropped in later versions for some reason.
- Navigate to the folder you want to save in:
WinXP

 Click on the down arrow for the text box Save in: to display a simplified folder tree.
 Manage files & folders in dialog: While in an Open or Save As dialog box, you can do most of the
tasks that you learned to do in My Computer and Explorer, like rename,
move, copy, delete. Popup menus are available, too. You can even create a new folder using the
New Folder button
Manage files & folders in dialog: While in an Open or Save As dialog box, you can do most of the
tasks that you learned to do in My Computer and Explorer, like rename,
move, copy, delete. Popup menus are available, too. You can even create a new folder using the
New Folder button  on the toolbar.
  Some applications are not entirely
happy with doing these things inside a dialog box. They may lock up or
crash. So test your applications before you try to manage files within a dialog box. You wouldn't want crash the program before you actually saved your work!
Some applications are not entirely
happy with doing these things inside a dialog box. They may lock up or
crash. So test your applications before you try to manage files within a dialog box. You wouldn't want crash the program before you actually saved your work!- Click on the icon for
the drive for your removable media, in the drop list.
The dialog box changes to show the contents of the Class disk, including the folders that you created in the previous lessons. Problem: Flash
drive did not show in drop list
Sometimes the list does not show a removable drive until you have used it.
Solution: Select My Computer in the drop list. The drives will show in the pane below. Double-click your flash drive from there to show its contents
Vista, Win7, Win8: The Save dialog opens with a folder tree and contents pane which
show the last folder to which you saved a file.- If necessary, in the folder tree, scroll to see your Class disk and then click its
name.
It's contents display at the right.
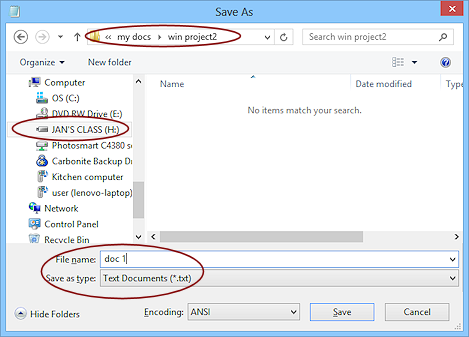 Double-click on the folder my docs and then double-click on win project2.
- At the bottom of the dialog, in the
text box File name: type doc 1 .
Yes, there is a space in this name!
- Click on the down arrow in the text box Save as type: to see what your choices are. There are not many for Notepad,
but other programs may have a long list of file types to choose from.
- Select the type Text
Documents.
- Click on the Save button.
The file is saved.
The complete path looks something like:
e:\my docs\win project2\doc 1.txt , where the letter for your drive may be different. It depends on what kind of removable media you are using and how many USB devices are connected to your computer.Remember - spaces are important in a path, too!
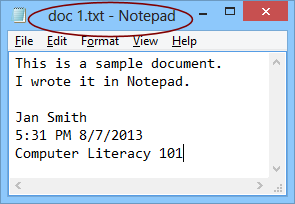 The title bar of Notepad changes to include the new name, with a txt extension automatically added. Most applications have a
default extension to add to a filename if you don't type it in yourself.
The title bar of Notepad changes to include the new name, with a txt extension automatically added. Most applications have a
default extension to add to a filename if you don't type it in yourself. To see what extensions an application uses on its saved files, click on the down arrow in the 'Save as type' box. In an Open dialog box, on the other hand, this list will show what extensions the program can open. But it may not be able to save in those types. For example, Microsoft Word can open Lotus Word Pro documents (extension lwp) but cannot save in that format. It's a one-way translation.
Close Application
- Click the Close
button


 on the Title bar.
Notepad closes.
If you made changes to your document since the last time you saved it, a dialog will appear that asks if you want to save the document. Only you know if you need to save those changes.
| © 1997-2018 Jan Smith All Rights Reserved |
Site Map What's New |
Privacy Policy Terms of Service Copyright Acknowledgements |
~~ 1 Cor. 10:31 ...whatever you do, do it all for the glory of God. ~~
Last updated: September 23, 2018