
Note: This site will be taken down July 1, 2024.
Jan's Working with Words
Interface: Ruler
 A ruler is used to measure distances, of
course. Word and other word processors have built-in rulers. So, you
do not have to hold a physical ruler up to the screen to try and figure
out how big something is on the page you are creating. That would not work
well anyway. Most monitors have a frame, so the ruler won't lay flat.
Worst of all, the size on the screen is not the same as the size on the
printed paper. It's enough to drive you crazy! Thank goodness for the
built-in rulers.
A ruler is used to measure distances, of
course. Word and other word processors have built-in rulers. So, you
do not have to hold a physical ruler up to the screen to try and figure
out how big something is on the page you are creating. That would not work
well anyway. Most monitors have a frame, so the ruler won't lay flat.
Worst of all, the size on the screen is not the same as the size on the
printed paper. It's enough to drive you crazy! Thank goodness for the
built-in rulers.
Use the ruler to measure:
- Page width and height
- Margins - top, bottom, left, right
- Header and footer heights
- Column widths
- Table cell width and height
- Tab indentions
- Image size or distance from other page parts
The Ruler
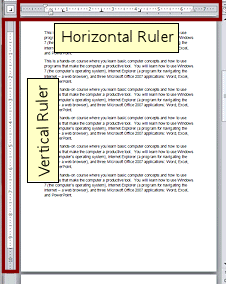 The horizontal ruler at the top of the document area
is used for more than just measuring the width of your page. With it you can set
page margins, paragraph indents, tab stops, and column widths. If your pointer
hovers over a part of the ruler, a ScreenTip may show you what the part does.
The horizontal ruler at the top of the document area
is used for more than just measuring the width of your page. With it you can set
page margins, paragraph indents, tab stops, and column widths. If your pointer
hovers over a part of the ruler, a ScreenTip may show you what the part does.
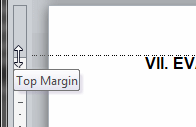
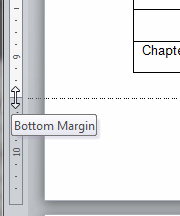
The vertical ruler is shown by default in Page Layout view down the left side of the page. With it you can adjust top and bottom margins and row height in tables.
For precise measurements it may be easier to use
one of the dialogs,
Page Setup, Paragraph, Tabs, or Columns, whichever is appropriate.
You cannot use the ruler to set everything about the layout of the page. Other settings are on the Page Layout tab, such as setting up columns of text in part of the document.
Using the Ruler
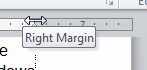
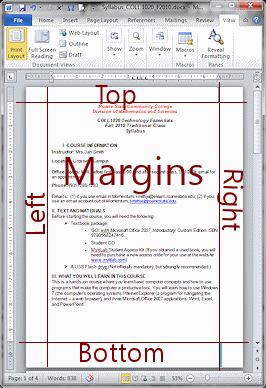 Margins: What is a margin? The margins of a page are the blank areas around the text
area. On the ruler, the margin is gray and the part measuring the text area is
white.
Margins: What is a margin? The margins of a page are the blank areas around the text
area. On the ruler, the margin is gray and the part measuring the text area is
white.
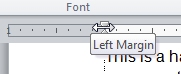
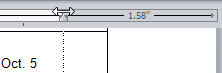
How do you change a margin on the ruler?
Click the boundary on the ruler between the gray and white sections. A two-headed arrow appears. Drag.
![]() Show exact measurements on ruler
Show exact measurements on ruler
Hold the ALT key down while dragging
a margin on the ruler to see exact measurements for the margins and text area.
![]() Problem: Can't get the two-header arrow at the left margin
Problem: Can't get the two-header arrow at the left margin
If there are left indent markers sitting at the left margin boundary, you will
get ScreenTips for the markers instead of the two-headed arrow unless your mouse
is in exactly the correct position.
Solution: Temporarily move the indention arrows
out of the way,
drag the margin as you wish, then put the indention markers back.
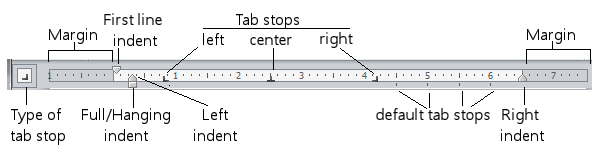
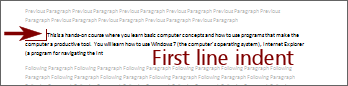
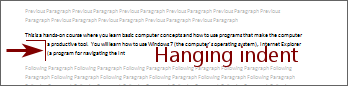
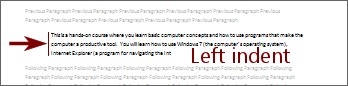
Paragraph indentions: A paragraph indention changes the way the paragraph wraps in some way. Normal text starts at the left margin and keeps going until it hits the right margin and then wraps to the next line.
Examples of indented paragraphs:

How do you change indention on the ruler?
Drag a pointer or the indention box on the ruler.
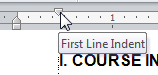
 The down pointer, on the left of the ruler, sets the first line
indent (the amount the first line of a paragraph is indented). Standard
indention is 1/2 inch.
The down pointer, on the left of the ruler, sets the first line
indent (the amount the first line of a paragraph is indented). Standard
indention is 1/2 inch.
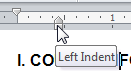
The up pointer on the ruler sets the left indent of lines of the paragraph after the first line.
Dragging the small box below the pointer sets the left indent for the whole paragraph. Both pointers will move when you drag the box.
The down pointer on the far right of the ruler sets the right indent for the whole paragraph.
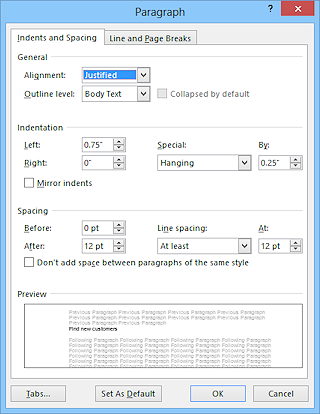
The Paragraph dialog lets you set all of these distances on the tab
Indentions and Spacing. You can use the Paragraph dialog launcher ![]() on the Home ribbon tab or double-click one of the pointers on the ruler. Be precise in where you click.
Those pointers are small!
on the Home ribbon tab or double-click one of the pointers on the ruler. Be precise in where you click.
Those pointers are small!
Tab stop: What's a tab stop? It sets how far the cursor moves to the right when you press the TAB key. It's where the TAB stops. Tab stops let you line things up or create space without having to create a table.
 Default
tab stops: A new blank document has tab stops set every half inch, or 1.25 cm,
across the page. In Word 2007 these are shown by tiny gray marks below the ruler marks. When you insert your own tab stop, the default ones to the left of yours are erased. In Word 2010 and 2013 the default tabs are there but do not show on the ruler.
Default
tab stops: A new blank document has tab stops set every half inch, or 1.25 cm,
across the page. In Word 2007 these are shown by tiny gray marks below the ruler marks. When you insert your own tab stop, the default ones to the left of yours are erased. In Word 2010 and 2013 the default tabs are there but do not show on the ruler.
How do you insert your own tab stop?
First, select the type of tab stop by clicking the
button ![]() at the far left of the ruler to toggle it through the choices:
at the far left of the ruler to toggle it through the choices:
-
 Left justified at the tab
 -
 Centered on the tab
 -
 Right justified at the tab
 -
 Justified on the decimal
 -
 Justified on the vertical bar, |
 -
 First line indent
 -
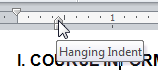
 Hanging indent
Then click on the ruler in the white space at the point where you want your tab stop. Drag to move it.
Remove a tab stop by dragging it off the ruler.

![]() Tip: Show exact measurements on ruler
Tip: Show exact measurements on ruler
Hold the ALT key down while dragging
a tab to see exact measurements
for where you are setting a tab.
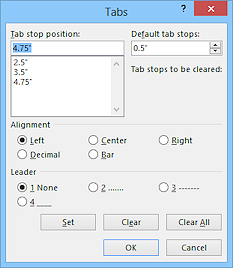 Tab Dialog: There
is a dialog for Tabs but it's not obvious how to find it.
Tab Dialog: There
is a dialog for Tabs but it's not obvious how to find it.
Home > Paragraph Dialog > Indents & Spacing tab > Tabs... button at the bottom left.
Or, double-click the ruler to set a tab stop and open the dialog. You can clear the tab stop if you don't want it and then add in the ones you do want. You can be very precise using the dialog!
| © 1997-2018 Jan Smith All Rights Reserved |
Site Map What's New |
Privacy Policy Terms of Service Copyright Acknowledgements |
~~ 1 Cor. 10:31 ...whatever you do, do it all for the glory of God. ~~
Last updated: September 23, 2018