
Note: This site will be taken down July 1, 2024.
Jan's Working with Databases
Basics: Access Objects: Table Design
Tables are the foundation of any database. The simplest database contains one table with a few simple fields. Of course a relational database will usually have several tables.
Parts of a Table
A table is made up of records which contain one or more fields, each of which has several properties. This gives you a lot of freedom in the characteristics of your table. That means you have to make a lot of choices! Happily, the default choices are frequently just what you need.
A field must have a field name and a data type. It might also have a description. Each data type has properties; some types have more than others.
You use Design View for defining the table and can use Datasheet View for actually entering data. It is actually better to create a form for entering data, but that is another lesson.
In this lesson you will create the table in Table Design view by defining the fields. In the next lesson you will add the records in the Datasheet view.
Design View
The Table Design View lists all of the fields in the table along with their data types and descriptions. You do not see any records in this view. Each row represents a field. A Field Name and a Data type are required for every field. A Description is optional. When you select a field or a cell in one of the columns, there are further properties in the bottom of the window. You will see different choices for different data types.
Selecting: When a field (the whole row) or a property is selected in the table, a rectangle surrounds what is selected.
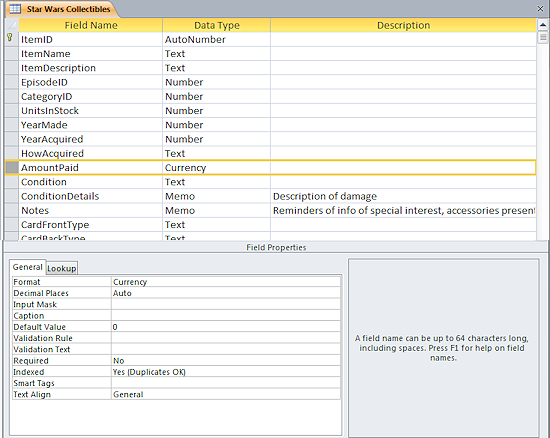
View: Table Design
Field Name
A field name, like other things in Access, can have up to 64 characters. It can contain letters, numbers, and symbols except for a period (.), an exclamation point (!), an accent grave (`), brackets ([ ]), and double quote mark ("). You cannot start a field name with a space. It will be safer to not use spaces or special characters at all.
![]() Avoid
using property names as field names: Access can get confused if your
field has the same name as
a property, such as Name, Caption, Format, or Height.
Avoid
using property names as field names: Access can get confused if your
field has the same name as
a property, such as Name, Caption, Format, or Height.
Data Types
 You must choose a data type for each field. The data type determines what
kind of data you can store in the field and how much disk space is reserved
for that data.
Most data types also have other properties for which you can choose values, like the
number of decimal places or a default value.
You must choose a data type for each field. The data type determines what
kind of data you can store in the field and how much disk space is reserved
for that data.
Most data types also have other properties for which you can choose values, like the
number of decimal places or a default value.
Types:
-
Text types - Can hold plain text or text combined with numbers as in an address. Good to use for numbers that are not used in calculations like phone numbers, part numbers, and postal codes. Will sort as characters, where the order of numbers is like 1, 10, 100, 2, 20, 200...
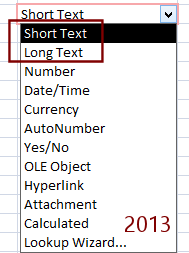
- Text or Short Text (Access 2013, 2016) - less than 255 characters. Default field size is 50
characters.
You should choose a size that will hold the longest entry that you expect. 
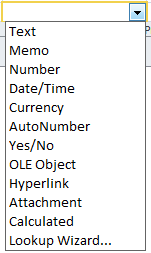
 Access 2007, 2010: Memo -Can hold 65,535 plain
text characters. Cannot contain formatting.
Access 2007, 2010: Memo -Can hold 65,535 plain
text characters. Cannot contain formatting.

 Access 2013, 2016: Long Text - Holds up to about 1 GB. Can be configured to accept Rich Text Formatting in a desktop database but not a web database.
- Text or Short Text (Access 2013, 2016) - less than 255 characters. Default field size is 50
characters.
-
Number types - For calculations and sorting as numbers instead of text.
- AutoNumber - Automatically assigns a unique number to each record. Great to use for an primary key.
-
 Number - Several number field sizes are available, like Byte, Integer, and Long
Integer.
Number - Several number field sizes are available, like Byte, Integer, and Long
Integer.
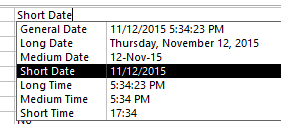 Date/Time - Use this type in order to sort
and calculate with dates and times correctly. Dates are numbers
representing the number of days since December 30, 1899. Earlier dates
are negative numbers. See also Microsoft on storing date/time
Date/Time - Use this type in order to sort
and calculate with dates and times correctly. Dates are numbers
representing the number of days since December 30, 1899. Earlier dates
are negative numbers. See also Microsoft on storing date/time  .
.
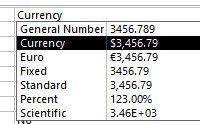 Currency - Use for high accuracy
and for money. Avoids rounding. Can hold 15 digits to the left and 4
digits to the right of the decimal point.
Currency - Use for high accuracy
and for money. Avoids rounding. Can hold 15 digits to the left and 4
digits to the right of the decimal point.
- Yes/No - Use when there are only two choices - Yes/No, On/Off, True/False
- OLE Object - OLE = Object Linking and Embedding. Field can hold only one object. Objects include formatted text, complete documents, spreadsheets, images, sounds. Can be up to 1 GB in size if there is enough disk space. Access databases are limited to a total of 2 GB, including OLE objects and attachments. The original program handles the display in Access, so it must be installed on the computer where Access is installed. Most file types are turned into bitmaps, which take a lot more space than with the new Attachment data type.
- Hyperlink - Up to 2048 characters for a URL (Uniform Resource Locator) or UNC (Universal Naming Convention) path
- Attachment - Adds one or more files like a document, image, or presentation, to a record. This results in a much smaller file size than using an OLE Object, which could only include one file per field.
- Access 2010, 2013, 2016: Calculated - Uses fields from the same table to perform a calculation and store the result in the table. This is not the same as a calculated field in a query, form, or report.
Use with caution! There are some issues:- If you change the expression for the calculation after entering records, new records will use the new expression but old records may still use the old expression. That is not usually acceptable!
- If an older version of Access is used to open the database, the table with a Calculated data type field will not open! You get an error message. No queries, forms, or reports that use that table will work.
- Expressions allowed are limited.
- Lookup Wizard - Starts a wizard that will create a list of values to choose from for the field.
See also Microsoft's
online list of Access data types ![]()
Things to consider when choosing a data type:
You want to choose the data type that will use the least amount of space on your hard disk without being too small for any future data. You must think carefully!
-
How many text characters are needed?
Example - Phone Numbers: If you know that all phone numbers are from the USA, you could set the size to 10 and have the user type in the numbers without any punctuation, like 5555551234. But, if a phone number might be from another country, you cannot use size 10! How long is the longest phone number in the world??? I don't know. But it is longer than 10.Example - Names: It is harder to know how many characters you will need for names of people, cities, products, or companies. The default size of 50 may not be enough! Do not choose a size less than 50 unless you are VERY sure that you won't need more later. Be sure to count the spaces, too.
Company names, in particular, can get long sometimes. My local phone book has some long corporate entries:
Cumberland County Medical Center Regional Cancer Center = 55 characters
Cumberland County Playhouse Production Shops & Rehearsal Hall = 61 characters
Highland Federal Savings & Loan Assoc Fairfield Glade Branch = 60 characters!
Even with some abbreviations, some names can be long!Having separate fields for parts of a name helps, like FirstName, MiddleName, and LastName for people. For companies you might use fields like CompanyName, Department, Branch, and Region.
-
What kind of numbers: Some number data types are for whole numbers only, like -123 or 1067. Others are for decimal numbers like 123456.987 or 0.00375. All data types for numbers have a maximum and minimum number that can be held in the field. You will need to know what size numbers you can expect in order to choose wisely.
Example - Number of People: These will always be a whole number so you have 3 choices.
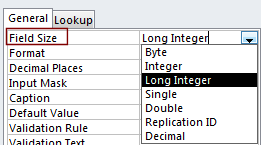
Data type Byte requires that values be between 0 and 255 and uses 1 byte of storage.
Data type Integer can hold whole numbers between –32,768 and 32,767 in 2 bytes of storage.
Data type Long Integer can hold whole numbers between -2,147,483,648 and 2,147,483,647 (over 2 billion!) in 4 bytes of storage.Example - Gross National Product: This will be a very large number. Possibly larger than the Long Integer type can hold.
Example - Scientific measurements: These might be very small as well as very large decimal numbers.Data type Single can hold a 7 digit decimal number in 4 bytes.
Data type Double can hold a 15 digit decimal number in 8 bytes.
Data type Decimal can hold a 28 digit decimal number in 12 bytes.
![]() Text won't calculate: If a number has data type
Text, you won't be able to use it in calculations.
Text won't calculate: If a number has data type
Text, you won't be able to use it in calculations.
![]() Display
Format vs. Data Type: The formatting of the data is not the same
as the data type.
Display
Format vs. Data Type: The formatting of the data is not the same
as the data type.
For example, you can type numbers in a field that has Text data type and then align them to the right. Those numbers will look just like they were Number type, but you won't be able to add with them. Another example is Date/Time data type. You can format a date as 19-Jun-06 or 6/19/06 or Monday, June 19, 2006. These are different ways to display the same date value, which is a number. If you want another format, like 06-19-2006, you must change the data type to Text. Then you will not be able to calculate using the date.
![]() Changing data type
later: You may have difficulty changing a data type later. If there is
a relationship set up between your table and another one, you may have to
delete the relationship first, change the data type, and then recreate the
relationship. If you already have data in the field, any data that is too
large for the new field type will be cut short. Any data that is not
appropriate for the new data type will be tossed out. Plan carefully before changing a data type when there is already data in place!
Changing data type
later: You may have difficulty changing a data type later. If there is
a relationship set up between your table and another one, you may have to
delete the relationship first, change the data type, and then recreate the
relationship. If you already have data in the field, any data that is too
large for the new field type will be cut short. Any data that is not
appropriate for the new data type will be tossed out. Plan carefully before changing a data type when there is already data in place!
Description
The Description appears in the Status Bar when the cursor is in the field in Datasheet View or in Form View. Its purpose is to help the user enter the right data and enter it in the correct format.
Examples, when you might want a Description:
- Format for entering: Should a phone number be entered as 123-555-1234 or as 1235551234 or as (123) 555-1234?
- Kind of entry: Should money be rounded to whole amounts ($525) or must you include the decimal part ($525.33)?
- Choices or explanation of what to enter: What codes can be entered in the field and what do they stand for? A drop list or scrolling list box is often used to restrict the choices to the ones that work! The Description message can add warnings or explanations about the choices.
Primary Key 
Each table needs to have a field called a primary key that will be unique for each record. Usually this is an AutoNumber field, which automatically assigns a number when a record is created. An AutoNumber has type Number: Long Integer.
Sometimes you can use existing data for your primary key, like a serial number or identification number, or even a combination of fields, like first, middle, and last names. Of course you must be VERY sure that what you have selected will ALWAYS be different for EVERY record!
Design Issues
How will you use your table?
The order of the fields will be important if you will be working directly
in the table. If you use a form to enter data (recommended!), the order of fields in the
original table will not matter.
What type of data?
Think about the size of the field and the data type that you need. For
fields that will be shared with other tables, the data types must almost always be
the same.
Undo Changes: Design View
In Design View, MS Access keeps a list of the last 20 actions. You can
use the ![]()
![]()
![]() Undo and Redo buttons on the Quick Access Toolbar to back up through the list of
actions.
Undo and Redo buttons on the Quick Access Toolbar to back up through the list of
actions.
![]() Key Combo method:
Key Combo method:
Undo = CTRL + Z;
Redo = CTRL + Y
![]() When you change views or
objects, the Undo list is wiped out. There is no Undo list in Datasheet view! This is a reason not to enter data directly in Datasheet view.
When you change views or
objects, the Undo list is wiped out. There is no Undo list in Datasheet view! This is a reason not to enter data directly in Datasheet view.
Common Mistakes in Table Design
- Putting into one field data that should be in separate fields
Example: Using one field for the City, State, and Zip Code is convenient to type. BUT, you cannot sort on State or filter to see records for a certain zip code.
- Using the wrong data type.
Example: Zip codes - Zip codes start with 0 in some areas. That leading 0 will be dropped by Access if a number data type is used. 02234 is not the same as 2234 to the Postal Service! You don't do arithmetic with those numbers anyway. A text type works better in this situation.
- Leaving field sizes at the default size
Example: The default size for a text field is 255. That is far too large for the State field when you are using the 2 character abbreviations for states. A Memo/Long Text field is needed when the entry may be longer than 255 characters. Such fields cannot be as easily sorted or filtered as Text/Short Text fields can, however. Choose carefully!
- Trying to get all the data into a single table
Example: An invoice has information about the customer, the ordered items, the information about each item ordered (how many, color, size...), and shipping information. The customer information has to be repeated for each order. Shipping info might be the same for some orders and different for others. Wasted space! All this information is too much and too complex for a single table! It takes 3 tables - customers, orders, orderdetails.
| |
Step-by-Step: Create a Table |
|
| What you will learn: | to create a blank database to create and edit a table to add fields and choose data types to view properties for field and for table to save a new table |
The Story So Far:
Our fictional travel agency, World Travel Inc., wants to offer their regular
customers an Access database that they can use to record the information about
their trips.
Start with: ![]()
Create Blank Database
- If necessary, open Access.
- Create a new blank database.
Access 2007: Office button > New > Blank database
 Access 2010: File tab > New > Blank database
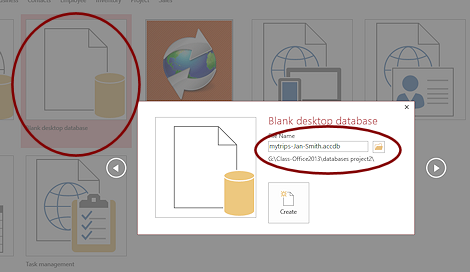 Access 2013, 2016: File tab > New > Blank desktop database
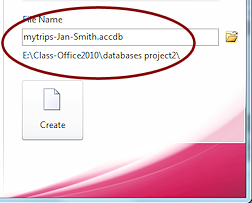
 Edit the file name to mytrips-Lastname-Firstname.accdb but use your own first and last name, of course. Change the folder to your Class disk in the folder databases project2.
-
Click on the Create button.
 The new database opens to a blank table in Datasheet View, ready for you to start getting creative.
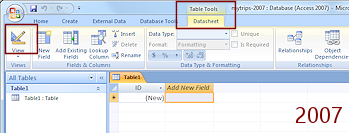
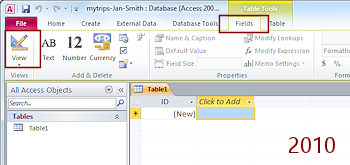
Access 2007 has one context ribbon tab - Datasheet. Access 2010, 2013, and 2016 have two context ribbon tabs, Fields and Table.
The new database opens to a blank table in Datasheet View, ready for you to start getting creative.
Access 2007 has one context ribbon tab - Datasheet. Access 2010, 2013, and 2016 have two context ribbon tabs, Fields and Table.
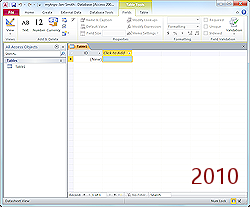
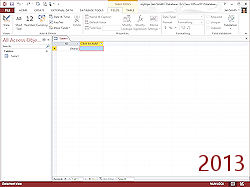
Initial blank Table1 in new database
Access starts a blank table named Table1. You could start entering data in this blank table. The fields will be automatically named Field1, Field2, etc. You really don't want to leave those boring, unhelpful names in place! You could double-click the column heading and type a new field name.
Access will have to guess what data type the field should have and can easily guess incorrectly. So, you will still need to go to the Table Design View to make adjustments. We might as well go there now.
Plan: Design Table
Think first. Create second! You should figure out what fields you will need and their data types before you ever start creating the table. Making changes later is easy for some things but very messy for others. To add more fields later is easy. To delete a field is easy unless it is used by a query, form, or report. In that case you must change all of the objects that use that field before you will be allowed to delete the field. Changing the data type of a field can be an even bigger problem since data can get chopped off or lost entirely.
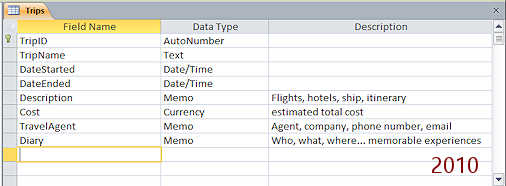
This table is about trips. What fields do you need to record the details of a trip?
Who went, where you went, what you did, what it cost, how you traveled, where you stayed, what special happened, where are the photos for this trip...?
You will start off with fields for the following information:
- Trip name - Text/Short Text type
- Beginning date - Date/Time type
- Ending date - Date/Time type
- Description of the trip - Memo/Long Text type
- Cost - Currency type
- Travel Agent - Memo/Long Text type so the agent's contact info can be included
- Memo - to write about special events or favorite activities - Memo/Long text type
Edit Table
You need to get into Design View to start defining your table.


 Click the Design View button at the top left of the active ribbon.
The View button is also found on the Home ribbon tab. The icon for this view shows a pencil, ruler, and a drafting triangle.
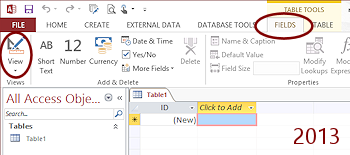
Views button: Design View
A Save As dialog opens for the Table1 that was automatically started when you created the blank database.
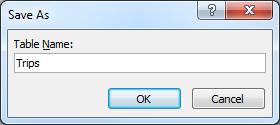 Type as the table name Trips.
-
Click on OK to save the table with its new name.
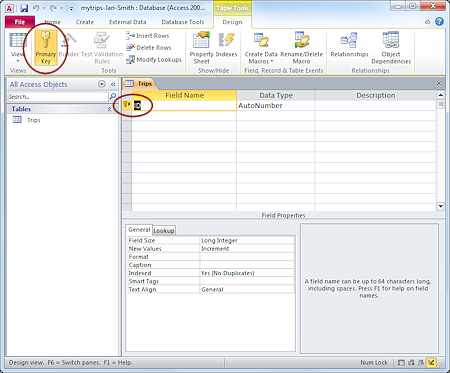 The Table Tools: Design tab for the table opens. The Design view has columns for Field Name, Data Type, and Description. More properties for the current field show at the bottom of the pane.
The first field is automatically filled in as an AutoNumber type with the default name, ID. You need to change that. This field is already set to be the Primary Key for the table. It has a key icon beside it and the Primary Key button on the ribbon is highlighted.
 Use unique field names: Since many tables have an AutoNumber field as the primary key, edit the field name so that it is unique in the database. It can cause tremendous confusion if two tables have fields with the same name, especially for the primary key fields.
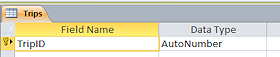 Edit the Field Name in the first row to read TripID.
-
Click the Save button


 in the Quick Access Toolbar at the top left of the window.
The changes to your table are saved.
Add Fields; View Properties
- Use the TAB key to move from cell to cell and enter the remaining fields, their data types, and
descriptions, as shown in the illustration. For now, accept the default values for the
properties in the lower part of the window.

The Options smart button shows when you TAB out of a Long Text field. You can chose to have the Description text show on the Status Bar wherever the field is used.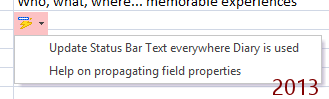
- Click on each field name in turn and look at the various properties of each data type at the bottom of the dialog. So many choices. It's nice that the default values will usually work!
-
If necessary, click the Property Sheet button on the Table Tools: Design ribbon tab.
The Property Sheet pane opens on the right. Note the Selection type is Table Properties. This pane shows the properties of the table itself. Again, the default properties are usually good enough.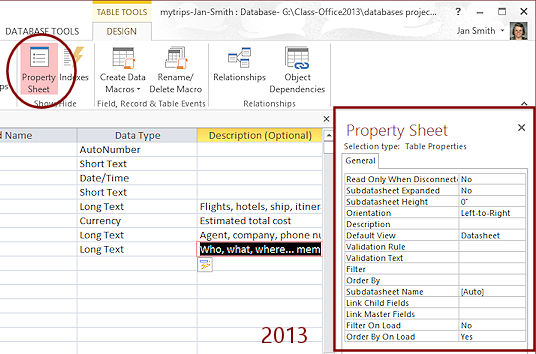
-
Click the Save button in the Quick Access Toolbar.
 Alternate Method: ALT + S
Save Object As: Later you might want to use this table to start up a similar one. You can use the Save Object As command to do just that. It's on the Office button menu in Access 2007 (Office button > Save As > Save Object As) and on the File Tab menu in Access 2010, 2013, and 2016 (File tab > Save As > Save Object As).
Alternate Method: ALT + S
Save Object As: Later you might want to use this table to start up a similar one. You can use the Save Object As command to do just that. It's on the Office button menu in Access 2007 (Office button > Save As > Save Object As) and on the File Tab menu in Access 2010, 2013, and 2016 (File tab > Save As > Save Object As). -
Close the database without closing Access, if you are going to continue to the next lesson. Save changes, if asked.
Access 2007: Office button > Close database Access 2010, 2013, 2016: File tab > Close
Your table is now ready to receive some records, which you will do in the next lesson.
| © 1997-2018 Jan Smith All Rights Reserved |
Site Map What's New |
Privacy Policy Terms of Service Copyright Acknowledgements |
~~ 1 Cor. 10:31 ...whatever you do, do it all for the glory of God. ~~
Last updated: September 23, 2018