
Note: This site will be taken down July 1, 2024.
Jan's Working with Databases
Forms & Reports: Subforms/Subreports:
Subreports
A subreport is similar in most ways to a subform. The same methods for creating and managing apply, for the most part.
A subreport can be put on a form in Access 2010, 2013, and 2016 but not in Access 2007. A subform can go onto a report in all three versions.
Combining reports: An unbound report can be a container for two or more subreports, which do not have to be related to each other at all.
A report that is bound to a table or query can include one or more subreports that are bound to the same table/query or to a related table/query. Such subreports can be put into the Detail section, Group Header/Footer, or Report Header/Footer. Subreports cannot go into the Page Header/Footer.
Nesting: As with subforms, a report can contain subreports or subforms which are nested up to 7 levels deep. There is no limit on the number of subreports or subforms that are not nested.
Creating a Subreport
- Drag an existing table, query, or form and drop it onto the main report.
- Use the Subform/Subreport tool from the Controls palette.
The Subreport Wizard will open in either case and take you through a few choices to create a new report. The wizard automatically adds it to the list of Reports in the Navigation Pane. You can open the new report (your subreport) and make changes, just like any other report.
Common Problems with Subreports
![]() Problem:
Subreport is too wide and is cut off at the right.
Problem:
Subreport is too wide and is cut off at the right.
A subreport is actually a report itself and has its own
properties, such as width.
The control that is showing the
subreport can have a smaller or larger width than what it contains!
Solution 1: Change with width of the control that displays the
subreport.
Solution 2:
Edit the subreport to fit in the available space.
You may need a separate copy of the subreport to edit just for the current use.
Be careful to notice whether you are changing properties for the control or for the subreport by checking the title of the Property Sheet.
![]() Problem: Data in subreport not synchronized with
main report. All data shows instead.
Problem: Data in subreport not synchronized with
main report. All data shows instead.
The properties Link Child Fields and Link Master Fields are what link
a subreport to the report.
Check the following for the Link Child Fields and Link Master Fields properties:
Correct field names, spelled correctly.
Fields are in the record source.
(They do not have to appear on the subreport or report but they MUST be in the sources.)Use the actual field names and not the names of the controls on the report and subreport, which can be different.
Data types for the fields are the same or are compatible.
A common source of trouble - An AutoNumber field is only compatible with a Number field whose FieldSize property is set to Long Integer.
![]() Problem: Column headings in subreport don't show
Problem: Column headings in subreport don't show
Subreports don't display page header or footer. If you put your
column labels in the Page Header, as is common, they won't show in a
subreport.
Solution 1: A subreport's Report Header/Footer do show, so you could put the column labels in the report's Header, IF you think the whole subreport will fit on one page.
Solution 2: If the subreport is longer than one page, use a Group Header in the subreport for the labels with the RepeatSection property of the group header to Yes. That will make the group header repeat on the page when the group does not fit on a single page.
![]() Problem: Only one column in the subreport instead of
the number planned
Problem: Only one column in the subreport instead of
the number planned
This problem occurs when you made two particular choices:
- In the subreport, the Column Layout property is
set to Down, Then Across on the Columns tab in the Page Setup dialog box
AND - In the main report, the CanGrow property is set to Yes for the subreport control.
Logically, this combination of properties lets the subreport control continue to grow in height. There is never a reason to move over to another column!
Possible Solutions:
- Change column direction: In the subreport, change Column Layout to Across, Then Down and, on the main report, leave the CanGrow property set to Yes for the subreport control. The subreport control will display multiple columns and expand as needed.
Disadvantage: You may not like having the records go across first. Records must be the same height.
- Don't let control grow: In the subreport, leave Column Layout set to Down, Then Across. On the main report, size the subreport control to fit the maximum number of records, and set its CanGrow property to No.
Disadvantage: If the number of records is greater than the maximum number you anticipated, records that don't fit in the subreport control will be truncated.
- Rethink the report: Instead of using a subreport, perhaps you could put the controls that show the data in the main report in a group header and put the controls that show the data in the subreport in the detail section.
Step-by-Step: Subreports |
|
| What you will learn: | to copy and paste existing reports to be parent report and subreport to edit subreport to add a subreport using drag-and-drop to report's footer to create a new report to create a subreport with the Subform/Subreport tool to edit subreport to hide duplicate records to remove unwanted white space with Can Shrink |
Start with: ![]() , resource files, worldtravel-Lastname-Firstname.accdb from folder databases project4 as updated in the previous lesson
, resource files, worldtravel-Lastname-Firstname.accdb from folder databases project4 as updated in the previous lesson
Copy and Paste Existing Reports to be Parent Report and Subreport
You will modify two reports that you created earlier. One will be the main report and another will be the subreport.
-
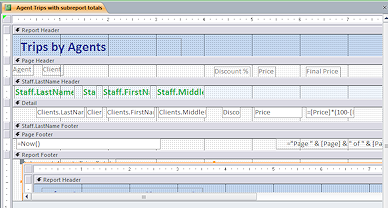
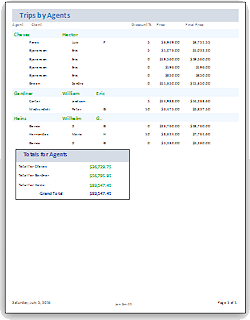
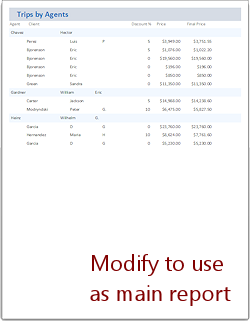 In the Navigation Pane, select the report Trips by Agents, which you
created in a previous lesson.
In the Navigation Pane, select the report Trips by Agents, which you
created in a previous lesson. This report shows the agents with a list of their clients and the cost of each trip, after applying any discount. You saved several versions of this report while learning to create totals. This first version does not include any totals and is missing some formatting that you added later. You will add a subreport that shows the totals.
 Problem: Report does not match illustration
Solution: Make changes to Trips by Agents to match. The Group Header should have a light blue background with the controls in the Group Header Back Style set to Transparent. The Detail section has a white background. All controls have Border Style set to Transparent. - Copy and paste it back to the Navigation Pane with the name Agent Trips with subreport totals.
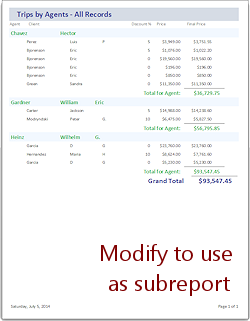 In the Navigation Pane, select the report Trips by Agents - Query Totals.
- Copy and paste it to the Navigation Pane with the name Subreport-Agents Trips Totals.
Edit Subreport
You will modify one of your new reports to make it work better as a subreport about totals.
 Open your new report Subreport-Agents Trips Totals in Design View.
This report will be eventually be put in the Report Footer of the main report. You can remove a lot of parts. You only need to see the agent's name and the group header (Staff.LastName header), and the Detail section.-
Delete controls and labels from Page Header, Staff.LastName Header, and Detail sections.
Resize those sections to zero height by dragging the bottom edge upward.
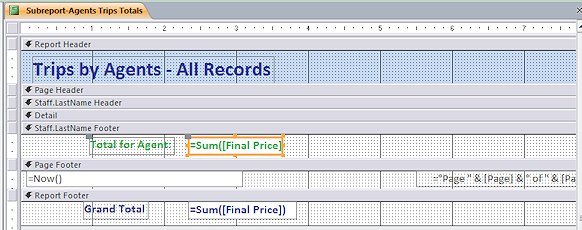
- Move the label and control for the total in the group footer and the one in the Report Footer to the left.
- Change the font size in those labels and controls to 12 pt.
- Resize the labels and controls to Best Fit.
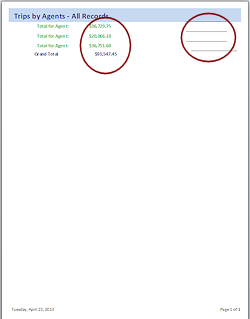
 Switch to Print Preview.
Whoops. Several things need fixing.- We forgot about the dividing lines that were in the original report.
- The Grand Total does not line up nicely.
- The name of the travel agent is nowhere to be seen!
- Return to Design View.
The dividing lines do not really show. - Select the dividing line in the Detail section by dragging across the area where it should be.
A gold border with handles appears. - Press the DELETE key to remove the line.
- Repeat for the dividing line in the Report Footer.
-
Size the control for the Grand Total value (in blue) to be the same as the one for the agent (in green) and align them evenly.
- Align the left edges of the labels Total for Agent and Grand Total.
- Delete the label Total for Agent.
- Use the Text Box control tool to add a new control at the left of the green total.
 Delete the label for the new control.
- Select the new unbound control.
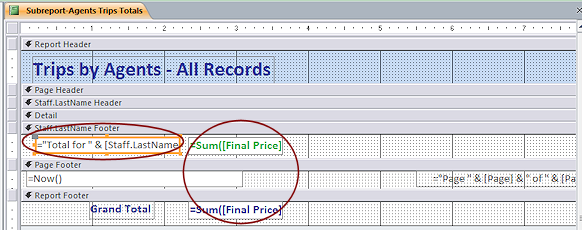
- In the Control Source property, type ="Total for "&[Staff.LastName]
This will work well for now since we know that there are not two agents who have the same last name. If that is a possibility, you would need to use a full name instead. - Change the Border Style to Transparent.
-
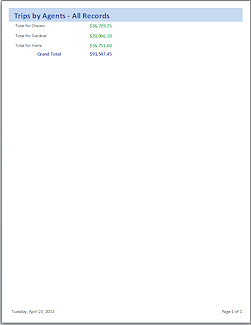
Switch to Print Preview.
Much better. -
 Save the report and close it.
[Subreport-Agents Trips Totals]
Create Subreport Control with Drag-and-Drop
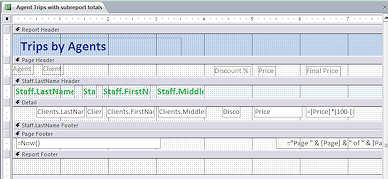 Open the other new report, Agent Trips with subreport totals in Design View.
- Format the labels in the group header as Green, bold, 14 pt.
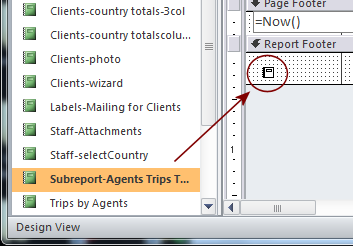
- Drag the report Subreport-Agents Trips Totals from the Navigation Pane over to the report.
The mouse pointer change to the Report shape.
-
 Drop it at the left of the Report Footer.
The Report Footer gets taller to hold the subreport but the subreport control is still too short to show much in Design View.Access keeps the control short but automatically set the property Can Grow to Yes. When Access figures out what to show in Print Preview, it can set the height to the correct value to show everything.
-
 Switch to Print Preview.
Just a few things to make neater.- The label for the subform is not readable and really is not necessary.
- The title for the subreport should say something about Totals.
- The subreport is wider than necessary and is falling off the page at the right. That will make an extra page print.
- Switch to Design View.
- Select the subreport.
-
Delete the label for the subreport.
It lies just above the edge of the subreport. When you select it, you will see its borders.Next you need to edit the subreport itself.
But, the subreport control is too short for you to see most of the subreport.
Editing this is best done in the Design View of the original report. There is a button for that! 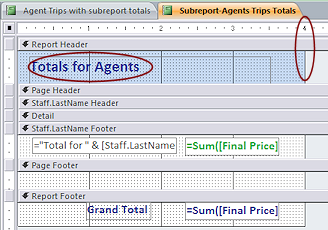 In the ribbon Report Design Tools: Design, click on the button Subreport in New Window
  , which is at the far right of the ribbon.
The subreport opens in a new tab while the main report stay open.- Edit the title of the subreport to read Totals for Agents.
- Change the title's font size to 16 pts.
- Delete the controls in the Page Footer.
They don't show in the subreport anyway. - Drag the report's right edge to the 4" grid line, which is wide enough to hold the controls that are left.
-
Close and save the subreport.
[Subreport-Agents Trips Totals]You are back in Design View of the main report but the subreport shows just as a white rectangle.
The subreport control is the same size as before. Resizing the report does not resize the control!
 If necessary, select the subreport control.
- Change the Width property to 4".
- Check the width of the report.
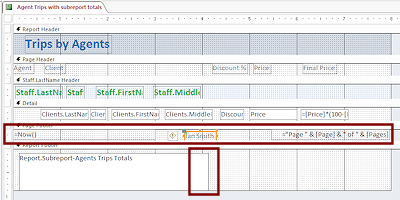
If it is wider than 8", resize it to just 8". - Add to the page footer:
- An unbound control on the left with the expression =Now()
This control will show the current date. Format the date as Long Date, text aligned Left, Border Style as Transparent. - A label to the center of the Page Footer with your name.
- Use the Page Numbers button on the Report Design Tools: Design ribbon tab to insert Page N of M style page numbers at the right.
- An unbound control on the left with the expression =Now()
- Save the main report.
[Agent Trips with subreport totals]
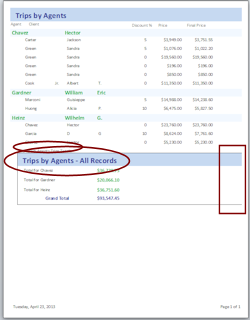
 Print. (There should be only 1 page.)
Problem:
Report uses 2 pages
Print. (There should be only 1 page.)
Problem:
Report uses 2 pages
Solution: Resize the report to be 8" wide or less.-
Close the report.
You have completed your first report that has a subreport!
Next you will create a report that has a subreport in the Detail section.
Create Agent Report
You will create a new report with information about agents and a new subreport that lists the agent's clients. The subreport will go in the Detail section of the main report.
The database already has forms that show all of the information about an agent. You will include only a few fields about the agent in this report so we can get to the subreport more quickly.
The previous lesson on subforms left us with an awkward listing of clients on the Agents with Clients form. A client showed up once for each trip. The duplication of names cannot be resolved easily for a form, but it can be fixed in a report. But first you will have to create the report!
- Start a new report with the Report Design button
 on the Create ribbon tab.
A blank report opens in Design View.
- In the Property Sheet in the property Record Source, click the ellipsis button
 .
.
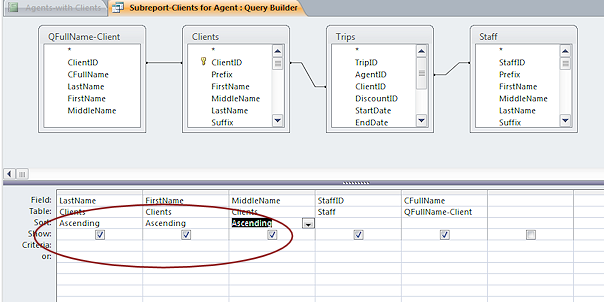
The Query Builder opens. - Add the Staff table and the query QFullName-Staff.
- If necessary, create a join between the two field lists by dragging the StaffID field from one and dropping it on the StaffID field in the other.
- Drag the * field for the Staff table to the grid and the field SFullName from the query QFullName-Staff.
- Drag the fields LastName, FirstName, Middle Name, and Title from the Staff table to the grid, in that order.
- Uncheck the Show box for these last three fields.
- Sort the last three fields Ascending.
-
In the Title column type the word "Agent" in the Criteria row.
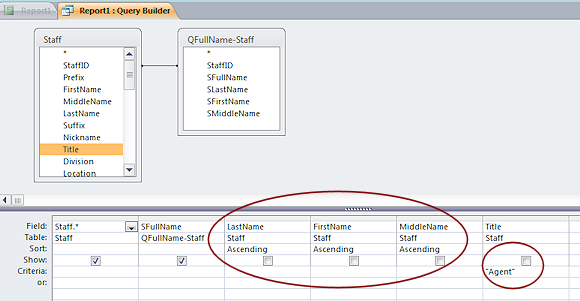
Now the query will include all of the fields about Staff but only records for Agents. The records will be sorted in normal alphabetical order for names.
- Click the Close button
 on the ribbon tab and save the changes to the SQL statement.
You are back in the report's Design View. - Show the Field List by clicking the Add Existing Fields button
 on the ribbon tab.
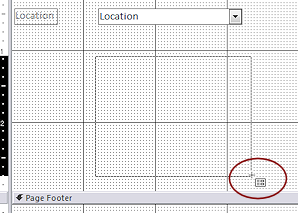
 - Drag and drop the following fields onto the Detail section of the blank report in the positions shown in the illustration:
- SFullName
- Location
- Photograph
- Set the Height for the Detail section to 3".
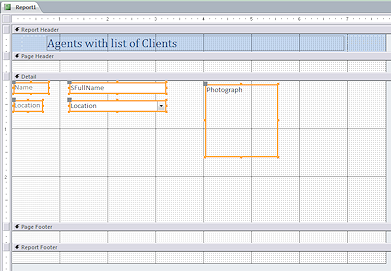
- Edit the label SFullName to read just Name.
- Select the controls for SFullName and Location and set the Width property to 2" wide.
- Change the Text Align property to Left.
- Set the Border Style property for the three controls in the Details section to Transparent.
- Delete the label for the Photograph.
- Resize the Photograph control to 1.5" x 1.5".
- Right click on a section bar and select Report Header/Footer to show those sections.
- Click on the Title button on the ribbon tab and enter Agents with list of Clients.
 Save the report with the name Agents, with Clients.
-
Switch to Print Preview.
There is a lot of extra space that gives you room for the subreport.
Create Subreport with Subform/Subreport Tool
You do not have to have a report already created to put a subreport into your report. When you use the Subform/Subreport tool from the Controls palette, the Subreport wizard will appear.
Thinking: What fields do you need to show an agent's clients in a subreport?
- Client's name
- A field to connect the subreport to the main report.
- Fields for the parts of the client's name to use to sort the clients' names into alphabetical order.
(The report will ignore the order in the original query.)
- Switch to Report Design View.
- Click on the Subform/Subreport tool
 on the Controls palette.
- Drag in the white space below the Location control to create a new
subreport.
The subreport wizard opens.
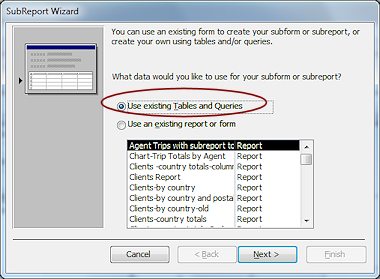 Select to use an existing Tables and Queries.
- Click on Next >.
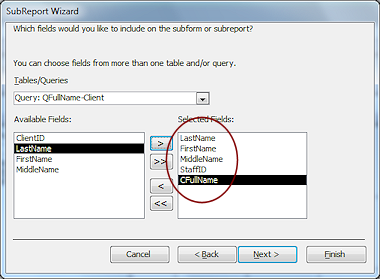 Select the following tables and queries and move the named fields to the right with the > button.
- table Clients: fields LastName, FirstName, MiddleName
These are the fields that can be used to sort the clients' names - table Staff: field StaffID
This field is needed to link the subreport to the main report. - query QFullName-Client: field CFullName
This is what we actually want to see in the subreport.
- table Clients: fields LastName, FirstName, MiddleName
- Click on Next >.
-
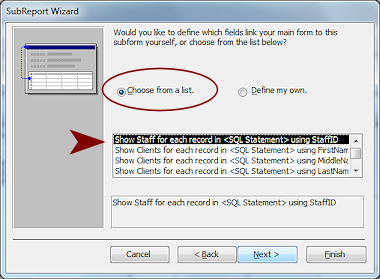 Accept the default suggestion for how to link the report and subreport: Show Staff for each record... using StaffID.
 The wording here is a bit tricky to understand. We want to see the client's names for a particular agent. What connects the main report to the subreport is StaffID from the Staff table. Remember you had to filter the Staff table to show just the people with a title of "Agent" for this report.
But the Clients table does not have a field that corresponds to StaffID. So what connects a client to a particular agent? It's all about Relationships! You already defined a relationship between Clients and Trips and between Trips and Agents. Access knows this and automatically connects the Agent with the Client for whom the agent did a trip. Sweet!
- Click on Next >.
-
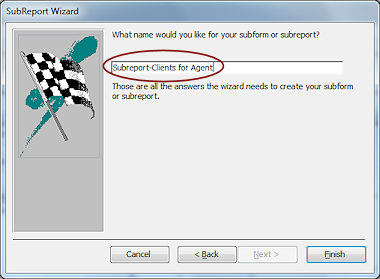 Enter the name Subreport-Clients for Agent.
-
Click on Finish.
Access creates a subreport control and a subreport that contains all of the fields.
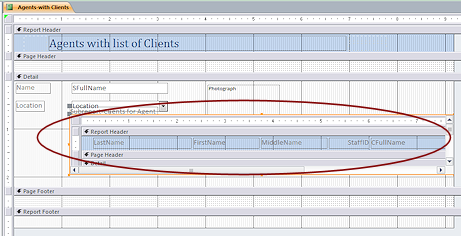
The subreport control starts at the top left of the rectangle you created with the Subform/Subreport but widens to show the full width of the subreport.
This subreport makes the report too wide for one sheet of paper. You do not need all of these fields to show.
The Navigation Pane shows the new subreport, Subreport- Clients for Agent.
- Save the report.
[Agents, with Clients]
Edit Subreport
- If necessary, select the subreport control.
This time there is enough room to edit in place.
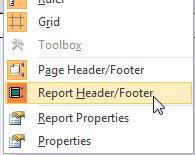 Right click on the Report Header and in the context menu, click on Report Header/Footer to toggle the command off.
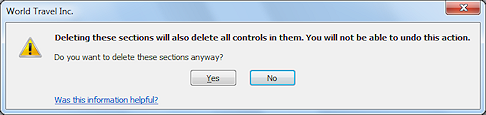 A message appears warning that deleting sections will also delete controls in those sections. This action is not in the Undo list.
- Click on Yes.
The Report Header and Footer sections vanish. - Repeat for the Page Header and Footer sections.
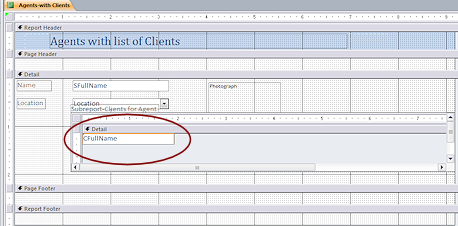 Delete all of the controls in the Detail section except CFullName.
- Drag CFullName to the top left of the section.
- Drag the bottom edge of the report up to the bottom of the CFullName control.
There should be no white space above or below the control. - Scroll sideways to see the right edge of the subreport.
- Drag the edge to the left until it bumps into the CFullName control.
There should be no white space to the left or right of the control. - Click out of the subreport.
- If necessary, drag the subreport control to line up its left edge with the left edge of the controls above and leave some white space above the subreports label.
-
Resize the subreport control's width by dragging its right edge to the left, leaving the control just as wide as the CFullName control in it.
-
Use the Property Sheet to set the Height property for the subreport to 0.5" .
Set the Height property for the Detail section to 1.7"The subreport control will show scrollbars in Design View even though there is nothing out of view.
You have two choices about what to do if there are more clients than will fit in the subreport control. You can let the subreport control grow or you can let it show vertical scrollbars.
 Click the Select Report button at the top left of the subreport.
(Be sure you are selecting the subreport!)-
In the Property Sheet for the subreport, change the property Scroll Bars to Vertical Only.
This will leave the subreport control at its current height, no matter how many or how few clients there are to list.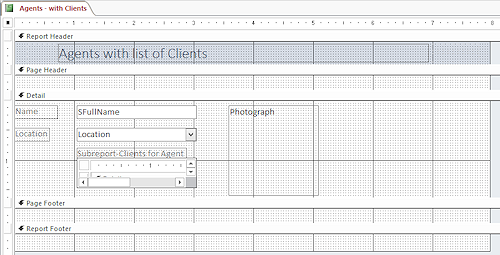 The extra wide subreport made the whole report wider than 8". It won't fit on a page width now.
 - Drag the right edge of the main report to the 8" grid line.
-
 Switch to Print Preview.
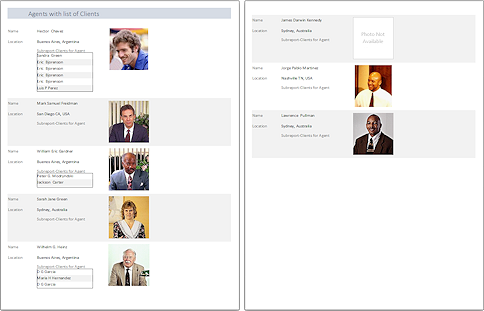
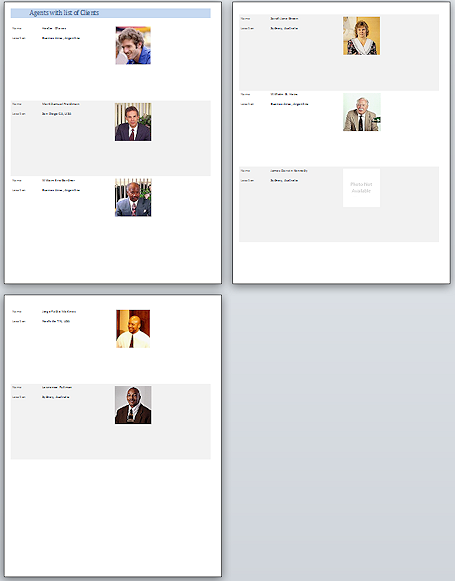
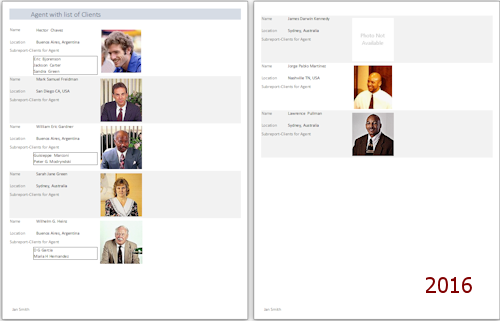
It takes two pages to show the seven agents. Only three agents have clients in the database yet.
There may be some problems left to deal with.
Issue: The subreport for Hector Chavez grew taller instead of showing a scrollbar. The subreport control automatically set the Can Grow property to Yes.
Issue: The subreport for Hector Chavez, the first agent, lists Eric Bjorenson four times. He must have booked four trips. You will hide the duplications in the next section.
Issue: The clients are not alphabetized. For the agent Wilhelm Heinz, D G Garcia is listed twice, with someone else in between.
You will have to fix these issues to get the duplicates to hide.
-
Save the report.
[Agents, with Clients]
Hide Duplicate Records
Report controls have a property that form controls do not: Hide Duplicates. When this property is set to Yes, duplicate entries will not show. But... there several other things that have to be set correctly or you won't get what you expected.
- Records must be sorted so that duplicates are next
to each other.
That's the only way Access can tell that there are duplicates. It's smart but not that smart! - Hide Duplicates is set to Yes for the control you want to hide.
- There is no extra space above or below what you are hiding. Otherwise the list of clients will have unexpected spacing.
(The layout already does this.) - Can Shrink property must be set to Yes for:
- Detail section of the subreport
- Control in the subreport
Fix Sorting
- Switch to Design View for the report.
- On the ribbon tab Report Design Tools: Format, in the Selection tab group, choose Subreport-Clients for Agents in the drop list.
This is another way to select part of a report or form. 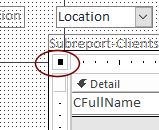 Click the Select Form button at the upper left of the subform.
A black square shows on the button and the Property Sheet show properties for the form.
-
Open the Record Source with the ellipsis button
.
The Query Builder opens.
It shows the tables, queries, and fields that you chose in the Subreport wizard. But it also shows the Trips table! You did not pick that one. Access did something smart. It added the Trips table in order to join the Staff and Clients tables together. - Sort Ascending for the fields LastName, FirstName, and MiddleName.
Make sure the fields are in that order. - Close Query Builder and save the changes.
Hide Duplicates for Control
- Select the control CFullName.
- Change the property Hide Duplicates to Yes.
- Change the property Can Shrink to Yes.
This will keep Access for showing empty space when a record is hidden. - Click on the Detail section bar in the subform.
- In the Property Sheet, change the Can Shrink property to Yes.
- Set the Alternate Back Color to No Color.
- In the parent form, move the label for the subreport to the left in alignment with the Location label and, if necessary, move the subreport control down to not overlap its label.
- Select the subreport control and set its Can Shrink property to Yes.
- Click on the Detail section bar in the parent form and set the Can Shrink property to Yes.
- In the Page Footer, add a label with your own name on the left.
-
 Switch to Print Preview.
Is this better?The subreport control shows the clients' names in proper alphabetical order and does not list anyone twice for the same agent. Hurrah at last!
Problem: Extra space or background color
The subreport form has extra space above or below the control CFullName.
Solution: Edit the form to remove the extra space.
- Save the report.
[Agents, with Clients] - Print page 1.
-
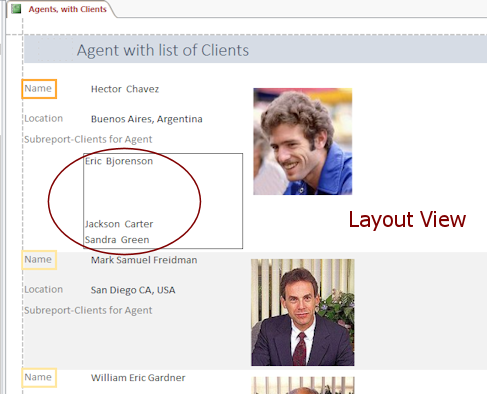
 Switch to Layout View.
Unexpectedly, the duplicate entries show as blank space in this view. Don't let that scare you. The Print Preview is still fine.
- Close the report
| © 1997-2018 Jan Smith All Rights Reserved |
Site Map What's New |
Privacy Policy Terms of Service Copyright Acknowledgements |
~~ 1 Cor. 10:31 ...whatever you do, do it all for the glory of God. ~~
Last updated: September 23, 2018